Hanging HVAC duct in floor joists is most of what a basement job is. The trunk goes up under the joists, the take-offs come off the top of it into the bays, and the round pipe runs to the boots. Any work in the basement has one goal — leave as much headroom as possible.
This is the residential version — wood joists, furnaces, a basement somebody is going to finish. Commercial steel is a different animal and gets its own page.
What people mean by “wood joist” now
The words are misleading. Say wood joist and somebody pictures a 2×12. In new construction today it almost always means a TJI.
There are two shapes you will run into. The first looks like an I-beam — two flanges with a web between them. The second looks like a little truss, with webbing running diagonally between the top and bottom chords. Attaching to them is close to the same job either way.
The thing to keep in your head is that a TJI is engineered lumber. It is wood, but it is a lot of glue. The bottom and top chord are wood and easy to attach to.
The trunk hangs below the joists
Supply trunk runs under the joists. The take-offs come off the top of it and go up into the joist bays to reach the rooms.
Find your path before you hang anything. Where the trunk lands decides where every branch can go, and it decides how much ceiling the owner keeps.
Strapping a trunk under the joists
Bend your straps (I have used drives in the past if I didn’t have any strap in the truck) to the width you need so the duct sits between them. Put a one-inch bend at the bottom of each one so there is a tab to go under the duct and carry it.
Three screws per strap. One through the bottom tab into the duct. Then one at the top and one at the bottom on the side, each within about an inch of the top and bottom edges of the duct.
Everything about the strap itself — gauge, how to get a clean bend without a brake, folding the top end over so it is its own washer — is in the hanger strap page.
Keep the duct within an inch of the joist
The duct should sit no more than an inch below the bottom of the joist.
That inch is not a preference. Every inch you hang low comes straight off the finished ceiling, because the framing and the gyp still have to go under the duct after you leave. Hang it sloppy and somebody finds out about it eight months later when the drywall goes up.
How low a duct is allowed to come in a finished basement
The 2021 IRC puts habitable space and hallways at seven feet of ceiling height. Basements are included where they contain those spaces.
There is an exception for what hangs down. Beams, girders, ducts and other obstructions in a basement containing habitable space are allowed to project to within six feet four inches of the finished floor. Ducts are named directly, so there is no interpretation needed on that part.
Two things people get wrong about that number. It is not the ceiling height — the ceiling around the duct still has to make seven feet. And measure to the bottom of everything, not to the bottom of the duct. Framing, gyp, mud, texture, paint, and a fancy coffer if they want one. The code does not say the finish comes out of the measurement, so do not assume it does.
Check what your jurisdiction adopted. Editions move and local amendments move them further.
Bulkhead or soffit — what you are actually building
A bulkhead is a build-down off the joists to conceal something that cannot be moved. It gets framed and finished in gyp so it reads like part of the ceiling.
A lot of people call the same thing a soffit. Neither word is wrong. Soffit means the underside of any construction element, inside or out, which is why it also means the underside of a roof eave. Bulkhead is the more specific word for the box you build.
What matters on the job is that the bulkhead is the reason the duct location is worth arguing about. Owners want headroom. They do not want a box running down the middle of the room. Where you can avoid one, avoid it.
Where the screw lands in a TJI
Aim for the center of the flange. Get too close to the edge and the edge can blow out.
The flanges are not wide. Stay at least three eighths of an inch off the edge when you start the screw and you will be fine in most cases.
We used two-inch metal screws for this. We probably should have used wood screws, but that meant drilling the strap with a bit tip, changing drivers, then driving a wood screw. Three steps instead of one. This was twenty years ago and there is no excuse for it — we did those fast, and we did them wrong.
Now that I think about it, I should have bought two drills and left a different driver in each one. I love buying tools, so there is no excuse there either — here are the ones every tinner needs.
On a steel joist you are not screwing into anything. You wrap the strap around the joist and fasten the lap to itself, at least twice.
Take-offs come off the top
Once the trunk is run, the take-offs go in. They come off the top of the trunk, into the joist space, and then elbow toward wherever they need to go.
I always used adjustable elbows in there. You are working around joists and whatever else is already in the bay, and a fixed elbow will not give you the angle you actually need.
If the take-off has to come off the side of the trunk instead — going through a wall, or under a structural member — plan on two elbows to get up into the joist space, and maybe a length of pipe between them.
The different take-off fittings and when each one gets used are on the take-off types page.
Pull the damper out of a take-off that is going to get buried
If your take-offs came with dampers on them, take them out.
That damper is about to end up inside a finished wall or ceiling. If it gets buried in a bulkhead or behind a wall, somebody has a room that will not heat and no way to reach the thing causing it short of cutting the wall open.
You can buy supply grilles with the damper built into the register. Then the adjustment is at the face where it can be accessed.
Holding round duct up in the joist space
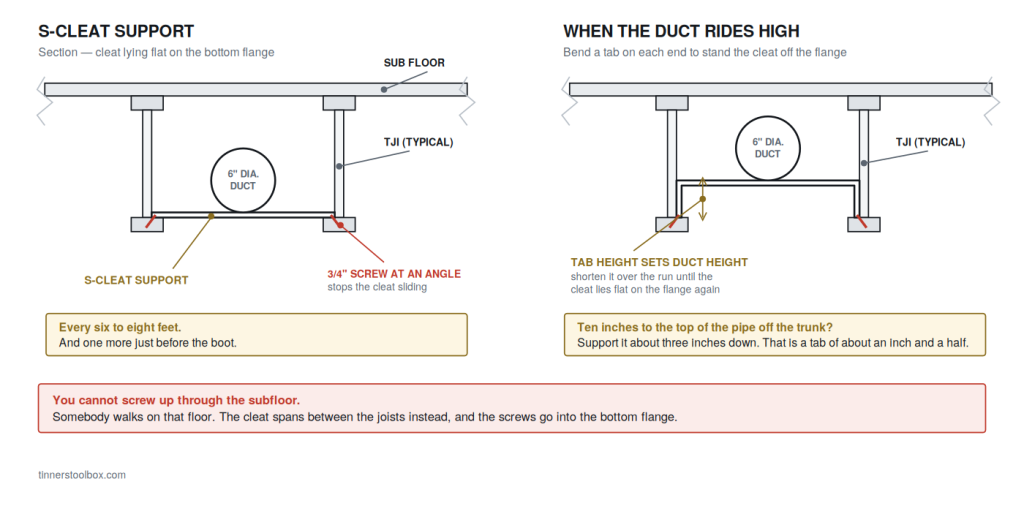
I have seen this go wrong. Somebody let the new guy attach the straps without much direction. You cannot screw up through the subfloor to hold the duct piping. The subfloor is what somebody walks on upstairs, and they will find your screws.
The easiest fix is an s-cleat. Lay one across the bottom chords of two joists and set the round duct on top of it. The joist shape gives you a lip on the bottom to lay material across, so the cleat has something to sit on.
Put a three-quarter-inch screw into each end at an angle into the bottom chord. That is not carrying the duct — it is keeping the cleat from sliding.
Space them every six to eight feet, and put one in just before the boot.
You can set the cleats first or keep one in your hand and slide it in after the pipe is up. Depending on the spacing, a cleat that is already in place can be the thing in your way.
When the round rides high in the joist
Sometimes the take-off and elbow put the pipe well up into the bay and a flat cleat lying on the chord is nowhere near it.
Bend a tab down on both ends of the cleat. Cut it so the flat part still spans the gap between the joists, and the tabs stand it off the bottom chord at whatever height you need.
Say the take-off and elbow put you ten inches to the top of the round off the trunk line. You need to support that pipe about three inches down from the bottom of the chord, which is a bend of roughly an inch and a half on each end.
Over the length of the run you bring that down, shortening the tabs until the cleat is lying flat on the chord again. That is how you get the pipe from high in the bay to where the boot needs it without it sagging in between.
The other way is to use strap. Cradle the duct in the strap and secure it to the side of the top chord of the joist. The attachment is hard to make due to space limitations but with patience you will get it.
Which way the crimp goes
If you cut a piece and need to put a crimped edge on it, stop and think about which end gets crimped.
The crimp goes the way the air is going, so the air flows past it instead of hitting it. You cannot always get it right when you are fitting around structure, but every one you get right is a little less resistance in the system.
More on that, including which way it flips on the return side, is on the round duct page.
Boots, backing and the six-inch rule
The boot is the round-to-rectangle transition that the register mounts into. Mount it to a joist or to something else solid. If it can move, it will move the first time somebody screws a register into it.
For a ceiling boot, put a piece of wood on the outside short ends of the boot so there is something to drive the register screws into later. A lay-in floor register does not need that backing, because lay-in registers are not screwed down typically.
Keep the boot at least six inches off the wall. A boot is a rectangle, and the edge of it needs room for the next trade to finish around it and for somebody to work the grille later.
Measure that six inches to the final finished surface, not to the framing and not to the gyp. Whatever goes on last is what you are measuring to, even if it isn’t there.
That one bit me. A “cabin” on a golf course up in the mountains of Utah — meaning a forty-five-hundred square foot fancy house — had a deep decorative wood wall applied over the drywall. I had the boot set off the gyp and forgot the wood was still coming. The finish surface moved and my register didn’t fit in the hole.
The strap that goes under the belly
There is a simpler way to hang a run when it works. Take a strap from one side of the duct, under the belly, to the other side, and screw each end into the joist. This can be in the bottom face of the chord or the side of the chord. It is a U that hugs the duct up against the joist.
If you go in the bottom of the chord, keep it tight and do not get too wide on the U. The smaller the bulkhead the better. If you go in the side stay near the center.
That only works if you are running perpendicular to the joists. Run parallel and it can run in the joist.
Cutting a joist — find the chart, do not guess
There is an allowable amount of web that can be cut out of a joist to get something through it, and yes, we had to do it to get duct where it needed to go but really tried to avoid it.
But there is no rule of thumb here and I am not going to pretend there is one. Holes in an engineered joist are governed by the manufacturer’s hole chart for that exact joist — the depth, the series, how big the hole is and how far it sits from the support. It is not a number you carry in your head from the last job, because the last job may have had a different joist in it.
The chart is published and it is on the job somewhere. Find it before you cut. Getting this wrong is not a duct problem, it is a structural one.
All of that is about wood. In a steel joist, no. Not by you. Cutting structural steel is an engineer’s call and it is not a duct decision — if the duct will not fit through, the duct changes shape or diverts.
Getting over a beam
Structural walls are where headroom fights happen. A beam comes across and the duct has to go over it or under it, and under it usually means the ceiling drops below what is allowed.
When that happens you reroute and find another way. Sometimes the new path is building a wall to run it in. We did not build those walls ourselves, but we talked it through with the owner so they knew what it would take to get the duct where they wanted it.
There is structural blocking sitting on top between the joists for shear, and there is an allowable amount of it that can come out. When we had several runs that all had to get past the same point, we clustered them and elbowed them in the same joist cavity so they went through one opening instead of three. Fewer blockouts is a better answer than a straighter duct.
What is already in the bay
Most houses do not run electrical conduit. The electrical is free-hung through the bays. Plumbing is up there too, and the gas line.
All of it needs coordinating, and residential is harder than commercial for it. On a commercial job there is usually an established team working to a standard everybody knows. On a house, most of the subs are moving fast and want to be done and gone to the next one.
Take some time to get to know the other trades and come up with a plan to work together if there is a tight space that everyone bottlenecks on. Fewer fights later.
The return side, and how we did it
The supply is ducted. The return, in a lot of houses, is not — the joist bay itself is used as the return.
We panned the bottom of the joists, ran a duct from the furnace intake up to the bottom of the panning, and screwed the tabs into it with an s-cleat. I was surprised the first time I saw it. The more houses I have been in since, the more common it turns out to be around here.
Here is the honest part. We never sealed them. Fast and dirty, and there is a lot of room in that for airflow loss and for the system pulling from places it was never meant to pull from.
Same story on the supply side. End caps went on, but I never taped a joint or ran mastic in a house. The one exception was my dad’s place, when we changed out his furnace and air conditioner. I taped those seams at the furnace and any others that i could get to.
Using a building cavity as a return is common, but there are restrictions. Check what your jurisdiction adopted. Here locally we have adopted 2021 IRC, yours may vary. As a rule of thumb, return air should only pull from conditioned spaces (even if your garage has a heater in it, it is not to be pulled from), and avoid kitchens and bathrooms.
Joists with knockouts — what I do not know
They make joists now with knockouts in them for running large duct piping through. That did not exist when I was doing this work, so I have not used that feature of a joist.
My guess is that it is an upsell from the manufacturer and not something every joist comes with. And I would expect it to be for insulated flex rather than hard pipe. Joists sit sixteen to twenty-four inches apart, and round duct comes in five-foot lengths — you would be cutting pieces down and adding a collar or crimping an end just to get from one bay to the next.
Common questions
How low can ductwork hang in a finished basement?
Under the 2021 IRC, ducts and other obstructions in a basement containing habitable space can project to within six feet four inches of the finished floor. The ceiling around them still has to make seven feet. Measure to the bottom of the finished bulkhead, not the bottom of the duct, and check what your jurisdiction adopted.
How do you support round duct between floor joists?
Lay an s-cleat across the bottom chords of two joists and set the pipe on it. A three-quarter-inch screw at an angle into each chord keeps the cleat from sliding. Space them every six to eight feet and put one just before the boot. You cannot screw up through the subfloor — somebody walks on that.
Can you cut a hole in a floor joist for ductwork?
In an engineered wood joist, sometimes — but only to the manufacturer’s hole chart for that specific joist. Those tables cover hole size and how far the hole sits from the support, and they are not interchangeable between products. Find the chart before you cut. In a steel joist, mostly never. Confirm with an engineer before cutting steel joists or metal beams. If the duct will not fit through, the duct change shape or divert.
How far below the joist should duct hang?
No more than about an inch, that gives you enough room to bend the drive. Every inch below that comes off the finished ceiling, because framing and gyp still have to go under the duct.
What is the difference between a bulkhead and a soffit?
Practically, nothing — most people use them for the same thing. A bulkhead is the build-down you frame and finish to hide a duct. Soffit is a broader word meaning the underside of any construction element, which is why it also describes a roof eave.
Should you leave the damper in a duct take-off?
Not if it is going to be buried in a wall or ceiling. A damper that gets closed in behind finish is unreachable. Pull it and use a supply grille with a damper at the register instead.
Most of this takes snips, a screw gun and a pair of seamers. If you are still building the bag, here is the ductwork tools list.