I will answer the question, and then I will tell you what I actually think.
You can hang duct by yourself. I have done it. For small duct, take-offs and short branch runs it is often easier alone than with somebody standing there waiting on you.
But I do not recommend it, and the reason is not that the duct will not go up. It will. The reason is that everything that goes wrong when you are alone goes wrong with nobody there.
So here is how it is actually done, where the line is, and what to do when you hit the line.
Some links on this page are affiliate links, marked (paid link). If you buy through one I may earn a commission at no extra cost to you. As an Amazon Associate I earn from qualifying purchases. I only link tools I would put in my own truck.
What holds the duct when there is nobody to hold it
With two people, one stabilizes and one installs. Alone, you get three points of contact and that is all you get.
- Your shoulder. The duct rests on it. That is what carries the weight, not your arms.
- Your free hand holds or presses the strap up against the duct. If there is not strap, your hand is holding the duct and is easier with narrower duct. The strap is not a separate helper. It only works because your hand is pressing it there if it is in the run of the layout.
- Your other hand guiding the duct into the s-cleat.
Here is the catch: you cannot fasten that strap while you are holding the duct. It sits in your hand doing nothing but carrying weight. The drive is what frees your hand — and until the drive is on, the strap is not a hanger. It is a third arm.
So the straps have to be hung and bent before the duct ever comes off the floor. Not because they are holding it up yet, but because you will not have a spare hand to go get one.
Spacing decides how hard this is
Six feet is easy to hit. Eight feet is very achievable. It just costs you something, and you should know what before you start.
At eight feet the straps are far enough apart that one piece of duct will not span between them. You need two to cover the run. That is another joint, another set of drives, and another trip up the ladder.
Two things make eight feet work:
- Do not fasten the straps on the sides of the trunk you are tying into. Leaving them loose there gives you push room to work the joint together, and it keeps you from kinking the strap at the top screw.
- Lay the straps out within one foot of the drive joint at the open edge, and no closer than three inches. That is the window. Closer than three inches and the strap is in the way of the drive ( you lose and inch with every piece of duct you assemble onto the run, remember that in your layout). Farther than a foot and the weight as you add more duct down the line is too much on the drives.
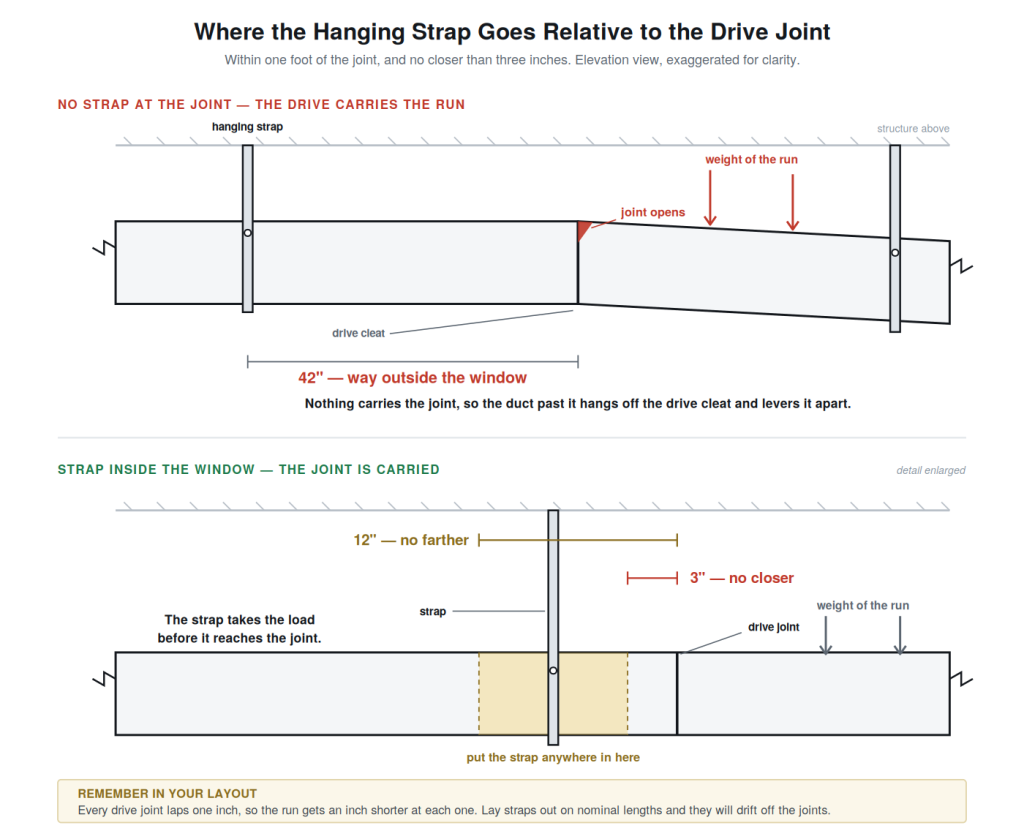
Whether you get six feet or eight is a question of the standard and the job spec, and whichever one is more stringent governs. Nobody sets hanger spacing for the convenience of the installer. But it lands on the installer anyway.
You can hang without a strap already in place. It just helps enormously when one is there.
Hang the straps first. Always.
With two people, one can use the straps to hold the duct on the straps while the other one works the joint. Alone, having straps set up is the key to success.
They need to be pre-bent at the height the duct is going to hang. Two ways to get that height:
- Measure off the floor. Works, but I do not recommend it. Floors are not flat. Whatever it is out in the slab ends up in your duct run.
- Set up a laser. Better. You know exactly where the bends go.
Either way, mark the strap while you are still on the ground. Score it with a bite from your snips and you get a crisp bend with your lineman pliers or hand seamers in the right place. Do not plan on chasing a laser line with the duct already in the air — in a room with windows and sun coming in, that line is hard to see, and you will be holding up to 20 pounds or more while you squint at it.
Lay the straps out to a chalk line snapped on the ceiling. If the straps fall on that line, the duct run comes out straight. That is the whole trick, and you do it before anything goes up.
The cockeyed insert — getting into the s-cleat alone
Here is the part nobody writes down.
With a partner you can line up the full edge and push it into the s-cleat with a little wiggling. Alone you cannot, because you do not have enough hands to keep it aligned and push at the same time.
Go in cockeyed.
Duct on your shoulder, one hand holding it, the other hand guiding. Poke the top edge into the s-cleat first, or the bottom, whichever you can reach — just one corner, not the whole edge. Then bring the other one in. You are threading it, not shoving it.
Once it is started, reach across to the strap on the far side, slide it under the duct, and press it up against the metal with your hand. It does not need a screw yet. Just holding it there takes the weight off your shoulder and hands.
Driving the joint with one set of hands
Now line up the drives on the duct and start the drive cleat over them.
You should get two to three inches by hand before you need a hammer. If you cannot, stop and figure out why — that is the joint telling you something, and it is usually that the piece was cut out of square before it was ever bent. Out of square is hard enough with two people. Alone it will beat you.
Once it is on, hammer the drive up until you have the one inch bend. Then shift to the other side, align those drives, and do the same thing.
You may need duct stretchers or a pair of diagonal cutting pliers to pull the new piece tight to the trunk. That is normal, not a failure.
One variation worth knowing. Install one drive, screw the bent end of the strap under the duct, then install the other drive. Adjust the straps once both drives are on. It is a step slower, but it gets the load off you sooner, and you can reposition your ladder, if needed.
The thing that makes all of this possible: the trunk you are tying into holds the weight of the piece you are adding. That is only true if the strap spacing behind you is right. If it is not, you are hanging a new section off a section that is already sagging, and you will find out about it later.
Never carry more than four or five feet in the air
Hand-carrying a section overhead, four to five feet is the limit. Past that the far end gets away from you and you go over backward. It is not a strength problem, it is a leverage problem, and being stronger does not help.
Get it onto the straps or onto a trapeze. That is what they are for.
And know where you are tying into the plenum before you start, then work out from there. Leave room at the equipment for your isolating joints and the filter rack. Nobody wants to cut a piece back out because the trunk starts three inches into where the filter rack goes.
The ladder method — and why I do not like it
If you are set on doing a real trunk run alone, the ladder becomes your buddy. We used the buddy system in Boy Scouts and it is still the right idea — team lifting, somebody watching, somebody there if it goes wrong. A ladder is a poor substitute for that, but it can hold the other end.
Here is the sequence:
- Build the duct trunk line extension on the floor. Twelve to sixteen feet of run, driven together on the ground.
- Seal the top while it is down there. Duct seal the top s-cleat and the drive bends now. It will save you some time later.
- Set one ladder at the trunk line you are extending from.
- Line the section up so it runs straight off the existing trunk.
- Lift and lay one end on top of the ladder.
- Set the second ladder at the far end and lift that end onto it.
- Secure the two far-end straps to the bottom bend. This is just to hold it.
- Go back to the trunk end and install the drives.
- Attach the rest of the straps down the run on their layout.
- Go back and adjust those first two straps perpendicular. They were holding the end, not hanging it. Easy to forget, and they will be crooked.
Now the honest part: using a ladder this way is unsafe. The top of a ladder is not a rest. It is a narrow, slick, and duct slides off it if tweaked the wrong way. I have had it happen to me when you are lifting your end and your buddy lets go on accident. Nothing to grab, and you are on a ladder. Drop your end to and hope the duct material is not bent or smashed.
If you are going to drop the duct, you are most likely going to have metal moving fast across your skin which will result in a laceration to your hand. Wear the gloves.
A trapeze instead of a ladder
Better option, and the one to use if you only own one ladder. Hang a trapeze where the far end needs to land and rest the duct on that instead.
Word of the day: trapeze. A horizontal bar hung on two rods or straps or a piece of angle hung from straps, so the duct sits on top of the bar instead of hanging from straps at its own sides. Named after the circus rig, and it looks like one. Trapeze material in this sense is usually angle or unistrut.
Put a screw through the bottom of the trapeze first so it cannot slide when you angle the edge of the duct onto it. That screw is the difference between a rest and a ramp.
Same process after that — lift the far end onto the trapeze, then go back to the trunk side and drive the system together (you may need to loosen that screw and adjust the trunk line on the trapeze).
The duct lift is the only version of this that is actually safe
Some links below are affiliate links, marked (paid link). If you buy through one I may earn a commission at no extra cost to you.
Everything above is a workaround. This is the real answer.
A duct lift holds the weight so you are not in an awkward position on a ladder trying to be two people. It will carry two assembled sections that you built on the ground, which means less time in the air and better seams, because you sealed them standing up.
The one I would point at is a 16 foot duct lift (paid link). Theses types of lift run from about ten feet up to considerably higher, but sixteen is the most you are likely to ever need — past twelve feet to the bottom of the duct you are on ladders that are too tall to work off comfortably anyway and unlikely to get to later when the ceiling grid goes in.
Pro tip: most of these can be rigged to run off a heavy duty drill (paid link) instead of hand cranking. If you are doing a whole building, do that on day one.
You cannot get one into every location. But when you can, and when the duct calls for it, it is the safest way to get metal in the air. If it is a rental rather than a purchase for you, that is worth pricing out — especially for heavy duct, large duct, or an awkward offset.
The lift is the big-ticket item. Here is the rest of what you carry.
After finished running duct do not forget to go back and seal the tops of any seams you did not get on the ground.
Above twelve feet, stop using ladders
If the bottom of the duct is going higher than about twelve feet, you need a scissor lift or something else with a basket. Not a taller ladder.
A basket gives you a place to stand, a rail to lean on, and somewhere to set your tools. A tall ladder gives you none of those and takes away the one you had.
How wide is too wide
Over 20 inches, working alone gets really difficult. That is my line, and it is a reaching problem more than a weight problem. To work both edges of a wide piece from a ladder you have to over-extend, and over-extending on a ladder is how people fall.
The ladder has to sit where you can hold the center of gravity and still reach both edges. Past twenty inches, that position does not exist.
Over 20 inch wide duct, get help and/or get equipment. That duct is heavy and it is wobbly, and wobbly is worse than heavy.
Gauge changes the answer completely
24 gauge is the standard, and everything on this page is written for it and for the lighter metal you find in houses. That duct behaves the way I have described.
Anything heavier than 24 — that is 22, 20, 18, 16 gauge — get a buddy. I mean that. It is a different material and it is unique enough, you are not used to it.
It is also uncommon enough that I cannot give you a full list of what each gauge is for, and I would rather say that than make something up. I have never once used 22 gauge duct. In my experience jobs skip it and go straight to 20 for specific purposes, then 18 and 16 for others.
The one I can speak to is a kitchen hood I built out of 16 gauge, because it had to be welded. That is the honest reason heavy gauge exists. At some point the job stops being sheet metal work and becomes fabrication.
Which is also why you do not work it alone. Most people meeting that metal are meeting it for the first time. Treat it that way. Be methodical, and plan every attachment and every support before you lift anything.
Hang elbows by themselves
If an elbow is small enough and you do not have a buddy, hang it independently. Do not build it onto a duct extension and try to fly the whole assembly.
An elbow adds weight in a direction you are not braced for. It will put you beyond the 5 foot dimension mentioned earlier.
Keeping the run straight when you cannot step back
With two people, one holds and one eyes the line. Alone you are the one holding, so the line has to be set before you are up there.
- Chalk line on the ceiling for the strap layout. Straps on the line means duct on the line.
- Height set at the bend before the strap goes up, laser or measurement, marked with your snips.
- A magnetic torpedo level. It sticks to the duct and gives you a hand back. Nothing to break and nothing to drop, unless you drop the level.
Final strap adjustment happens after the drives are on, not before. Get it connected, then get it straight.
What I have seen go wrong
Three failures, and all three are avoidable.
- The duct slides off the ladder. You lay one end on top, walk to the other end, lift — and the first end comes off behind you. The top of a ladder is not a rest.
- The straps were not up before the lift. Now somebody is holding weight while somebody else scrambles to get a strap in position. People fatigue fast doing that, and fatigue is when things get dropped.
- Forgetting to seal. Every time. If you do not seal it on the ground seal it after. Don’t forget. I had an owner walk around with a selfie stick checking for duct seal one time.
- Duct out of square. Sometimes the shop messes up and that mess up results in wide gaps at drives that make working alone impossible.
Does working alone cost more?
Yes, and it is not close.
Working alone, you are up and down the ladder seven or eight times per section with repositioning at every step. A second set of hands does not cut that in half — it removes most of it, because nobody has to come down to do the thing they could not reach.
The value of a second person is not comparable to what they cost. That is the honest math, and it is why the hours have to land on the bid the way they actually happen, not the way you hope they will. If you are writing that up yourself, Quick Draw is a tool I built to keep the hours and the estimate in the same place.
There is a second thing worth saying. Once a well trained apprentice can lead, you get a third person’s worth of work out of two people, and you get to step back and monitor the install instead of being the installer. That is worth more than the hours.
So should you hang duct by yourself?
For small duct, take-offs and short branch runs — yes, and it is often easier. I have done plenty of it.
For trunk line, wide duct, heavy gauge, or anything over twelve feet up — get somebody. And even on the small stuff, work in the same area as somebody else so you can call for a hand without it being a break down of the job.
The goal is to provide for yourself and for the people who count on you. If you do not go home tonight, they will miss you. Everything else on this page is second to that.
Questions I get about this
Does hanging duct take two people?
It does not require two people. It is much easier with two: one stabilizes the duct and one installs the drives and attaches to the hanging supports. Alone, the pre-hung straps and your shoulder do the stabilizing.
How long a piece of duct can one person lift overhead?
For installing duct, four to five feet hand-carried. Longer than that and the far end tips you over backward. Longer runs get assembled on the ground and lifted onto straps, a trapeze, or a duct lift.
How wide is too wide to hang alone?
Over 20 inches gets difficult, because you cannot reach both edges from one ladder position without over-extending. Over four feet wide, get help and equipment.
Do the hangers go up before or after the duct?
Before, and pre-bent to the hang height. Working alone, the straps are what holds weight while your hands are busy. Straps after the lift is the single most common way this goes wrong.
Can you rent a duct lift?
They are generally available as a rental, and that is worth pricing for heavy duct, very large duct, or an awkward offset — the jobs where the lift matters most are the awkward one.
What gauge duct should you not hang alone?
Anything heavier than 24 gauge — that is 22, 20, 18 and 16. Standard duct is 24 gauge and lighter, and that is what you can work alone. The heavy stuff behaves differently and it is uncommon enough that most people are working it for the first time. Plan every support before you lift.
Some links on this page are affiliate links, marked (paid link). If you buy through one I may earn a commission at no extra cost to you. As an Amazon Associate I earn from qualifying purchases. I only link tools I would put in my own truck.