Why won’t the drives go on?
Because the flat sheet was cut out of square before it was ever bent. The joint is tight on one side and open on the other, so the drive cannot span the wide side. It is a shop problem that you are finding in the field, and it started at the shear.
What you are actually looking at
Two sections that will not close usually are not both wrong. One of them is a parallelogram pretending to be a rectangle.
Hold them together and look at the gap all the way around. If it is even, you have a different problem. If it pinches at one corner and opens up at the one diagonally across from it, the flat was cut crooked. That is the whole diagnosis and it takes about four seconds.
It started at the shear
Sheet metal comes in ten foot sheets, four feet wide, square from the factory. The sheets sit on a flat table a little below shear height. You feed one in, let a tail extend past the blade, and measure from the blade out to the end of the tail.
That measurement has to be taken twice — once at each edge of the tail. If the two do not match, the sheet is sitting cocked in the shear, and the cut you are about to make will not be square to the factory edges.
That is where it starts. Not a bad machine, not a dull blade. A bad mark. One measurement taken carefully and the other one taken fast.
The stop bar helps but it does not protect you
A stop bar lets you set a measurement once, then pull each tail to the bar and cut without measuring again. On a run of five hundred pieces that is the difference between getting done and not.
But the bar itself gets set off the shear by a person, at both ends, with a tape. It has exactly the same failure mode as the measurement it replaced. Set the bar a little cockeyed and every piece behind it inherits that angle. The bar does not make you accurate, it makes you fast at whatever you already are.
An eighth of an inch becomes a quarter
Here is the part that surprises people, and it is the reason a small mistake in the shop is a real fight in the field.
Fixing a bad cut takes seamers, snips and patience. Here is the ductwork tools list for the first two.
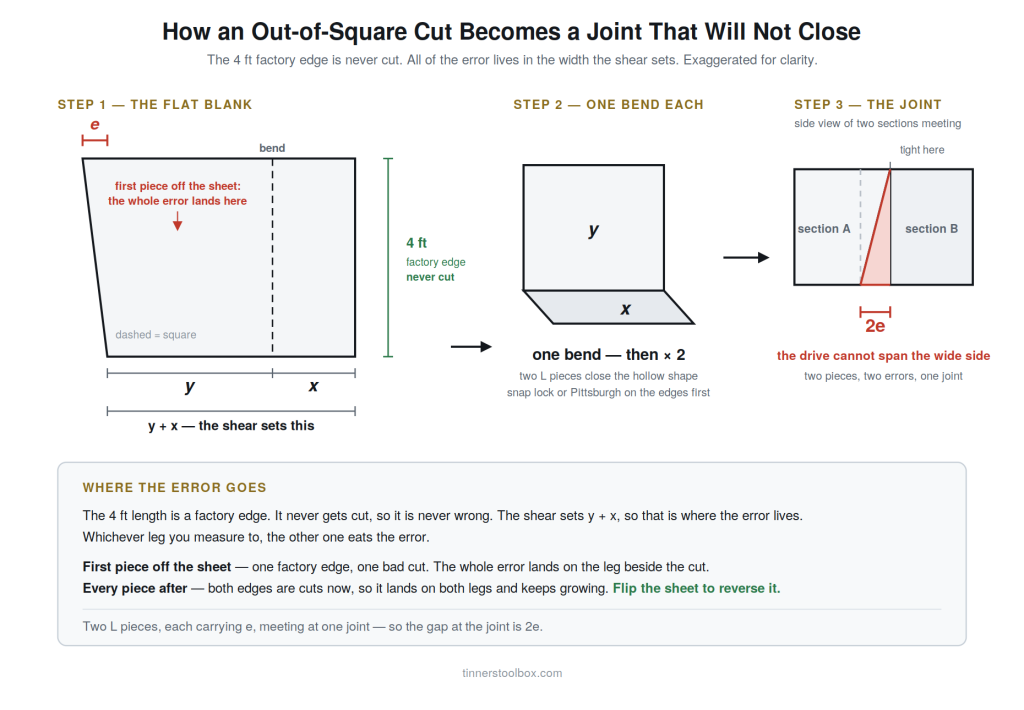
A rectangular duct section is not one piece bent four times. It is two L-shaped pieces, each bent once, joined at two seams. Both of them come off the same shear, and both of them carry the same bad cut.
So when they come together, the errors do not cancel. They stack. An eighth of an inch of bad cutting shows up as a quarter inch of bad fit at the joint.
On the flat you would never see it. An eighth over four feet is nothing you would catch walking past a table.
It gets worse the further down the sheet you go
The first cut off a fresh sheet has one good edge — the factory edge going against the stop bar. Only the shear side is off.
Then you slide the sheet through again. Now the edge sitting against the stop bar is the bad cut you just made, and the new cut adds its own error on top of it. The third one is worse than the second. The error walks.
It also changes where the error shows up, and that is worth knowing before you go looking for it.
On that first piece, the whole error lands on one leg. One edge is factory square and the other is the bad cut, so everything piles onto the leg beside the cut. Predictable, and easy to spot once you know to look.
Every piece cut after that on the same sheet is a compounding mistake. A measurement that is off 1/16 grows to an 1/8, then 3/16, and so on. Luckily they are only ten foot sheets. Not all metal comes that way — it also comes on rolls — but the shop I worked in did not have that set up.
Once the sheets are made up and assembled the issue is very noticeable, and it turns into the biggest problem of all: crooked duct in the air.
After notching and running through the seaming machine, you measure off the brake to set your y and the leftover x takes the difference. Whichever leg you measure to, the other one eats the error.
Which means the piece nobody checks is the one most likely to be bad.
The fix: flip the sheet
If the error is walking in one direction, turning the sheet over sends it back the other way.
Flip the sheet between cuts and the bad edge now leans the opposite way against the stop bar. The next cut comes back toward square instead of further from it.
I never saw anybody do this deliberately. It is the kind of thing you work out years later drawing the problem on a piece of paper.
Catching it before it leaves the shop
It should be caught at the measure. Double check the cut on the first few with a framer’s square, and periodically through the run. Taking those extra steps saves headache and loss of productivity in the field that cannot be regained.
Another way to check for square is to measure the diagonals. Run the tape from opposite corners, making an X across the piece. Laying a square on it is the easier method of the two. Doing either on five hundred pieces does not work, and pretending otherwise is how people who have never run a shop talk about quality control.
What we actually did was keep a framing square hanging within reach, use it the second something looked off, and check periodically. And that is the real rule:
Do not let your eye be the final say. If it looks wrong, put a real tool on it.
Your eye is good enough to raise the question. It is not good enough to answer it.
This really bit us on a job one time. We had a new shop manager who was familiar with fabricating duct but not an expert at it. All the duct came out imprecise and we spent so many hours modifying and straightening — fancy cutting, rebending drives. It was a literal nightmare while being awake.
The one check that is actually feasible
There is a shortcut, and it falls straight out of how the error behaves.
The error accumulates down the sheet. Each cut sits against the last bad edge and adds to it, which means the last piece off a sheet is the worst piece on that sheet. Everything cut before it is closer to square than it is.
So you do not have to check every piece. Check your stop bar every other sheet or so. If there is any doubt, check the last piece on the sheet — it is going to be off the farthest. If the last one is square, everything ahead of it is square too, because it never had as far to walk.
That turns an impossible job into one square laid on one piece per sheet. It is the difference between quality control you talk about and quality control that gets done.
What to do when you find one
In the shop
Cut it square and use it for a smaller duct. That is it. You cannot stretch the metal back to length, so whatever you trim off to get square is gone, and the piece is now good for something smaller than what it was cut for.
Not a disaster. Just make sure it goes back in the pile as what it can be, not what it was supposed to be.
In the field
You install twisted duct. That is the real answer and everybody who has hung duct knows it. Even the gap out as much as possible, fake it by cutting drive lap, and use screws to secure it even.
You force it together, rebend drives to get the system to close, and you use more mastic than the joint should need. The run goes in. It costs you time nobody estimated.
Found one? Check the rest before you hang another
This is the part that saves you the day, and almost nobody does it.
One bad piece is rarely one bad piece. Those sections came off the same sheet, cut against the same stop bar setting, by the same person on the same afternoon. If one is off, the rest of that bundle probably is too, and off in the same direction.
So stop. Put the piece down and check the bundle on the ground before you carry another one up.
- Visually check the standing storage pile of duct
- Mock fit them together standing up
- Check for uneven alignment
Finding this standing on the floor takes five minutes.
And if the whole batch is off, that is not a field fix. Rebending drives on twenty sections to force a bad batch into place is you paying for a shop mistake with your own hours.
The frustrating part is that replacement duct cannot be there until tomorrow at the earliest. So if you can make it work in the field, try it. If you cannot, do not waste the day — go make sure the process is done right in the shop. You need it tomorrow.
Stopping it at the shear
Everything above is triage. This is the actual fix, and all of it is free.
- Start with a square edge every time. If you step up to the shear and a piece of flat has already been taken off the sheet, check the sheet stock for square before you cut.
- Two measurements on the tail, every time. One at each edge, off the blade. If they do not match, the sheet is cocked and the cut will be too. This is the root cause and it costs about four seconds.
- Check the stop bar at both ends before the run — not just once when you set it up. The bar is tightened and it can loosen as it gets hit with the metal sheet, which puts the whole run out of alignment. Double check periodically, always.
- Flip the sheet 180 degrees between cuts. If you catch it in one cut and the cut is small, 3/16″ or less, it sends the error back toward square instead of letting it walk.
- Keep a framing square within arm’s reach of the shear, not across the shop. A tool you have to walk for is a tool that does not get used.
- Check the last piece off each sheet. Worst case on that sheet, and the only piece you actually need to put a square on.
None of that is a new machine or a new process. It is four seconds at the shear against an afternoon in the field.
How far off is too far off?
A working ladder, from what I saw:
- 1/16 to 1/8 inch — tolerable. Cutting the s-cleat edge flat, manipulating the drives, hard hammering, and it goes together.
- Past 1/8 — the drives get extremely difficult to hammer on. You will know.
- 3/16 and up — cut it square before it ships. Sending that out is handing the field crew a problem you already knew about.
That last one is worth saying plainly. Once a bad piece leaves the shop it stops being a five minute fix and becomes lost productivity in the air, at height, with a crew standing around.
You will know the second you hammer the seam
Here is the short version of why a bad cut announces itself. The full walkthrough is in how to connect rectangular ductwork.
Your free hand holds one edge. Your dominant hand sets the male piece into the female, holding the far end of the duct two or three inches above the female seam. Get it aligned so the drive edge and the s-cleat edge sit relative to each other — the drive edge is set back a half inch from the edge of the s-cleat edge — then hammer the seam gently home. Repeat on the opposite seam.
If the corners were cut square, nothing happens. It just goes.
If they were not, the far edge walks out of line as you finish hammering. The duct will literally teeter on itself if the cut is far enough off. You do not have to measure it and you do not have to think about it. An eighth of an inch is immediately obvious the moment that seam closes.
The duct tells you. You just have to be paying attention when it does.
Common Questions
Why is my duct joint tight on one side and open on the other?
The flat was cut out of square before it was bent. A rectangular section is built from two L-shaped pieces off the same shear, so both halves carry the same error and it doubles at the joint. An eighth of an inch of bad cutting is a quarter inch of gap.
Does the seam type matter — snap lock or Pittsburgh?
No. The seam is unaffected. You run one edge through each machine, the female edge and the male edge, and the drives go on the horizontal joint edge afterward. A bad cut is a bad cut either way. If you made this error with the Pittsburgh you have a lot of work ahead of you — no doubt you bent the seam and found the error when you flipped it to do the other side.
How much out of square is acceptable on duct?
A sixteenth to an eighth goes together with hard hammering on the drives. Past an eighth it gets extremely difficult. At three sixteenths, cut it square in the shop rather than sending it to the field.
Can you fix a duct section that was cut out of square?
In the shop, cut it square and use it for a smaller duct — you cannot stretch metal back to length. In the field you fix it as best you can by trimming the s-cleat edge to square it up, modifying the slip tab on the drive, rebending drives on the duct to close the system, and adding lots of mastic. The shop fix costs material. The field fix costs hours.
Does the error get worse on every piece?
Yes, if you keep cutting the same sheet the same way. Each cut goes against the previous bad edge and adds to it. Flipping the sheet between cuts reverses the direction and brings it back toward square.
Putting a run together? Here is how to connect rectangular ductwork, how far apart the hangers go, and the ductwork tools list.