As an Amazon Associate, I may earn a commission for qualifying purchases.
It might surprise you to know that there are many different shapes of duct. The most basic is rectangular or square, used for the main trunk lines in a house or most building types. But how do we connect rectangular ductwork together? The answer is a simple two-part system that has been holding duct together for generations: the s-cleat and the drive. Let’s dive in.
S-Cleat vs Drive Cleat
| S-Cleat | Drive Cleat (“Drive”) | |
|---|---|---|
| Where it goes | Top and bottom faces | Side panels |
| Shape | S-shaped, two pockets | Rolling ends “U” shape |
| How it holds | Both duct faces slide into the cleat | Slides over both sides of the “U” to put a lid on it. |
| Putting it on | Tap the bottom slot of the “S” on to the leading edge. | Insert the half lap on the drive over the half lap of both ducts. |
| What you need | An s-cleat, a ladder in most cases, a hammer. | A hammer, a pair of lineman pliers in case the gap is wide, a pair of snips. Maybe a pair of needle nose pliers to pull the joint. |
| Where it goes wrong | Inserting the top slot of the “S” onto the leading edge (the shape of a “2”). The s-cleat cannot go over the drive edge. | When the gap of the duct is too wide, the drive cleat will not fit over the drives of the duct. |
| Reuse on a tear-out? | If you are taking apart a piece of duct, the s-cleat can be reused in most cases. If you are demolishing old duct, it usually gets thrown away with the duct. | The drive will most likely not be reusable. The easiest way to get them off is to pound them off with your hammer, destroying them. If they need to be saved, see below article. |
What Connects Two Sections of Rectangular Duct?
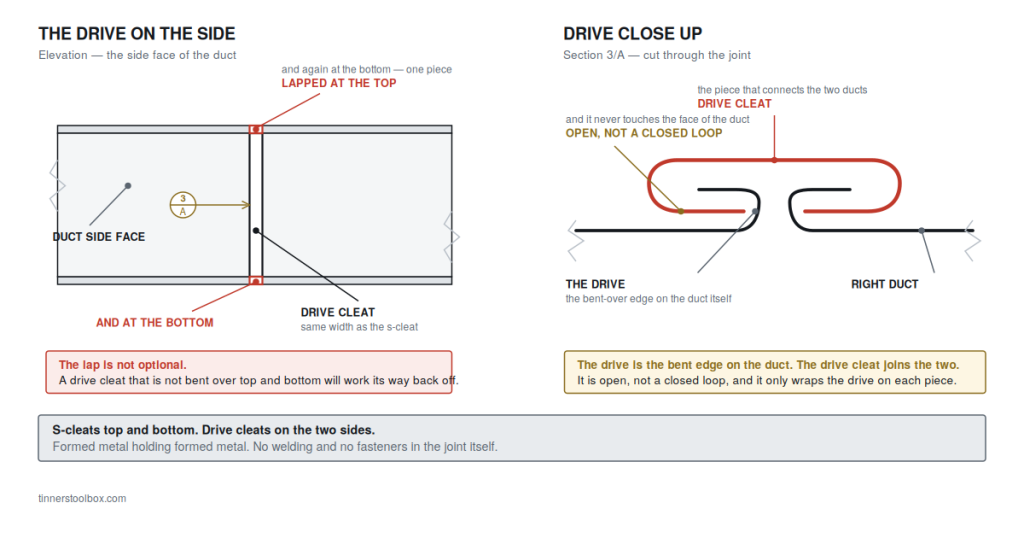
S-cleats and drives are the two part assembly used to connect rectangular duct work. The s-cleat slides onto two opposing edges and holds the load from one duct to the other. Drives slide over the other two bent edges and get bent over at the corners to keep the joint tight. They have a push and pull reaction. S-cleats alone do not close a joint.
Just starting out? Here are the hand tools worth buying first.
The lower section goes into the bottom pocket of the cleat so the
weight of the duct bears on metal, not on the cleat itself. Drives want
about an inch of tab to bend over at the corner.
You cannot get the orientation backwards. The s-cleat or connector typically goes on top and bottom and drive go on the vertical. If you rotate the duct 90 degrees the weight of the duct is now on the drives and will bend them open or the duct could slide out of each other. If the straps are improperly spaced the duct will sag a good amount and restrict air flow.
Slip and Drive Semantics
There are so many ways to express the joint connection of the duct. All of these can be used on the jobsite in the same day. Slip and drive, s cleat and drive, S & D, and s-lock are the same system.
In reality, all tinners know what the connection is and they will just get into the normal semantics that they choose. We typically called them S’s and drives on my projects.
What Is an S-Cleat?
The word of the day is s-cleat. A cleat is something that is used to connect things together. Teaming cleat with an S means that the cleat is in the shape of an S. Let’s talk about how to use s-cleats.
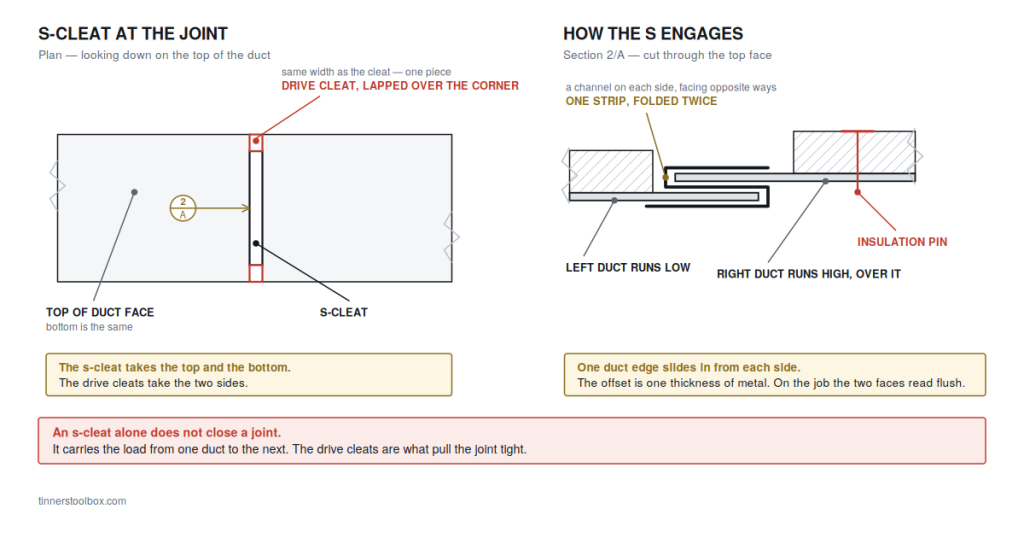
The s-cleat goes on the top and the bottom of the rectangular or square duct. It is a strip of sheet metal folded into an S shape, which gives it two pockets. One pocket slides onto the edge of the first piece of duct. The other pocket is left open, waiting to receive the edge of the second piece.
Here is the detail that separates a proper install from a sloppy one: the cleat goes on so that the bottom of the S rides on the duct, not hanging off of it. That way, when the second piece of duct is set into the top pocket, its weight is carried by the metal of the first duct — not by the cleat. If the weight hangs on the cleat, it stretches the cleat open and loosens the whole connection.
Cutting an S-Cleat to Length, and the Tab It Leaves
Cleats come long. The duct does not. So you cut them, and bulldogs or straights are what you cut them with.
Here is the part nobody warns you about. When the tip of the snip punches through the center part, it bends a small tab right in the middle of the cleat. You will not notice it standing there. You notice it when you go to put the cleat on and it will not take the duct edge.
That small tab creates a stop point when putting s-cleats on a duct edge. So much so that you will probably have to bang on the s-cleat to get it to sit properly.
The fix is a duct board knife. Work it into the end of the cleat and open the pocket back up with a slight twist of the wrist so it is not pinched from the cut. Be careful not to twist too much, the s-cleat will get loose on the edge and slide easily. A beater screwdriver does the same job.
This is the only time I would advocate for the straight snips. The straights will cut the width of the s-cleat and not put that small tab turndown in the middle. It is one more tool in the belt to carry around and the bulldogs are a more useful tool to me.
That raw end of duct is the one that got me thirteen stitches. I wrote about gloves after it.
Using the Drive to Lock It Together
The drive is the key to keeping the duct locked together. A drive that is not installed properly can lead to air leaks, unintended movement of duct during air movement, sagging, and loose connections. Bends in the duct reduce air flow — keeping duct straight and aligned is best for peak performance.
The drive is another folded strip of metal, but it works differently than the s-cleat. The side walls of each duct section have a small flange bent outward at the end. When the two sections come together, those flanges sit face to face. The drive slides down over both of them at once and clamps them together.
Then comes the part that ties the whole joint into one solid unit: the drive is cut a little long on purpose. That extra length gets bent over the top and the bottom of the duct — about an inch of overlap. When the tab folds over the corner, it locks down the end of the s-cleat too. That is how the s-cleat and the drive work together: the cleats hold the top and bottom, the drives hold the sides, and the bent tabs tie all four corners together.
Step by Step: Installing an S-Cleat or Slip-and-Drive Joint
Here is the full operation, in the order you would do it on the job.
Step 1 — Slide the s-cleats onto duct one. One cleat on the top edge, one on the bottom edge. Remember the orientation: the cleat rides on the duct so the added duct sits on top of the first so the cleats are not stretched.
Step 2 — Set duct two into the cleats. The edge of duct two slides into the open top pocket of each cleat. Done right, the weight of duct two is resting on duct one’s metal. The cleat is just keeping things aligned and sealed — it is not a load-bearing part, and it can loosen up if you make it one, especially on bigger ducts.
Step 3 — Drive the drives. Slide a drive down or up each side wall, over the mated flanges. Cut the extra off the drive so an inch is left at top and bottom. Then bend the extra inch of tab over the top and the bottom. You are doing this on all four corners — two drives, four tabs. When the tabs are bent, the joint is mechanically locked in every direction.
Step 4 — Seal all the seams. On commercial work, every seam gets sealer. A lot of homes do not use sealer on the duct, but to keep it professional here: seal it. I saw a reddit post of someone concerned about a portion of their duct. I gave a compliment because the joints were sealed and that was good to see.
Air that leaks out of a joint is wasted dollars. Big buildings spend big dollars to make sure air stays in systems. Also remember, leaking air whistles from small holes, you will hear a train all night if seams are left unsealed (tape could be an alternative but not perfect, a mastic is the best product).
A point of clarification, residential homes typically do not have insulation on the inside of the metal duct. That is a commercial thing and typically required in most instances for rectangle duct (excludes outside air, well trained reader). The drawings are going to be direct on what is required. Be sure to check yours.
Every step above takes something you are either carrying or borrowing. Here is the ductwork tools list — what earns a place in the bag and what you can leave at the shop.
Why This System Works So Well
There is a reason tinners have used slip-and-drive joints for generations. No welding, no special fasteners, no power tools required for the joint itself — just formed metal holding formed metal. The joint goes together fast, it comes apart if a section ever needs to be replaced, and when it is assembled with the cleats oriented right and the tabs bent over clean, it is straight, tight, and quiet.
The tools for the job are the same basic kit I cover in my ductwork tools list — snips to cut cleats to length, a hammer to set the drives and bend the tabs, and hand seamers if a flange needs dressing, even the beater screwdriver to open that cleat a little if it is pinched from cutting to size. If you are just getting started, my five essential hand tools for HVAC beginners covers what to buy first.
Reuse A Drive Or Throw It Out
There is really no reason to reuse a drive if you are taking duct apart. The demolition process is pretty heavy on a drive if the joint needs to be removed quickly.
If you insist on reusing the drive, you will not be able to reuse it on the same duct size, most likely. Once the top and bottom is bent over, the likelihood of getting the drive off is pretty impossible while keeping it intact.
Here are the ways I have done it. Unbend the bottom tab so it sticks out with your lineman pliers, unfold the top bend straight and cut it flush to the bottom of the bend. Take your duct board knife or pair of beater pliers, open the drive so it is not pinched from the cut. With your lineman pliers in your off hand, grab the bottom tab of the drive, strike the top of your lineman pliers with the striking face of a hammer. Repeat until you get it off, if it comes.
If the seam is loose enough it will come with a few strikes, if not, beat it off by striking the side of the drive from top to bottom. The weight pulls the top apart first and the drive will easily come off at the bottom two-third hit. The drive on the duct will need to be hand seamed back down to reuse the piece of duct.
To reuse the drive, cut the end with the tab used to grab with the lineman pliers. Open the drive bends with your duct board knife or beater screwdriver. Whatever the duct size was the drive is now two inches shorter. So if you need the drive for a 10 inch duct and you took it off a 12 inch duct, it is too short.
Never seam two drives together, always use a continuous drive on the side of a duct, that is just unprofessional.
Now You Know
Connecting rectangular ductwork comes down to two pieces of folded metal doing two different jobs. The s-cleat joins the top and bottom, with the weight of the duct riding on metal instead of on the cleat. The drive clamps the sides and locks the corners with its bent-over tabs. Seal the seams and the joint will outlast the building’s paint.
Are you cutting in an HET (High Efficiency Takeoff), you need this guide.
Next time you are in an unfinished basement, look up at the trunk line and find the joints. Now you know exactly what is holding them together.
I also built a free invoice and estimate tool for tradespeople — no signup, no subscription: quickdrawinvoice.com
Want to see what else has been posted: