Hanging duct from steel joists starts with a rule that decides everything after it. You do not cut the joist. Not the chords, not the web, not a little bit off the corner to make a piece fit.
The joist is fixed. The duct is the thing that changes.
Once you accept that, the whole job sorts into two categories and everything else is detail.
Two ways to hang it: through the joist or under it
Top of joist hanging is when the duct runs through the joist itself, up in the structure.
Bottom of joist hanging is when the duct hangs below everything on strap or on a bar.
Commercial work has steel joists with webbing, solid beams, wood joists and wood trusses, and every job has its own version of the problem. But it still comes down to those two. If you understand both, you can work out the job in front of you even if it does not look like the one I am describing.
Running duct through the joist
You run it wherever it fits in the general path on the plans, and wherever another trade is not already in the way. That is the honest answer. There is no elegant rule about picking the third opening from the column line.
What there is, is a hard limit on what “fits” means.
On a commercial job that routing is on a plan sheet before it is in the air, which is a separate skill worth having. Start with reading the mechanical drawings.
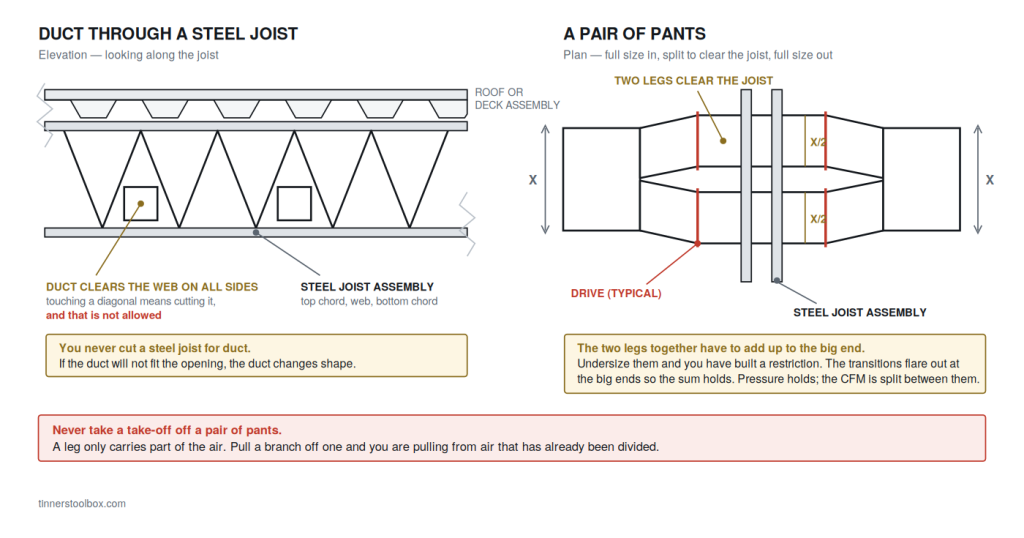
The duct has to clear the web on every side
Between the diagonals of a joist there is an opening, and the duct either passes through it without touching anything or it does not go there.
This matters on paper as much as it does in the field. If you draw a duct overlapping a web diagonal, you have drawn a cut. That is what the line means to whoever reads it next, whether you meant it or not.
Clearance on all four sides, or the duct changes.
Getting a strap through metal decking
With steel joists under W metal decking, the deck gives you the opening you need. The decking runs in a repeating profile, and where it forms an inverted U there is a gap you can get a strap into.
Push the strap up through that gap, take it around the joist, and bring it back down. Lap it over itself and screw it off.
Put a minimum of two screws in that lap. One screw is a hinge. The strap will twist on you as soon as it takes any load.
From there you attach the strap to the duct however the run needs it so the duct sits where it belongs going through the joists.
You do not screw into a steel joist
On wood you pick your spot and drive a screw. On steel there is no spot. You wrap the strap around the member and fasten the lap to itself, minimum two screws.
The steel carries the load by being wrapped, not by being fastened into. Everything else about strap — gauge, getting a clean bend without a brake, folding the end over so it is its own washer — is on the hanger strap page.
When the duct will not fit: the double offset
Joists are not all the same, and some configurations will not let a duct run straight through. There are two ways out of that and neither one involves a cutting torch.
The first is a double offset. It transitions the duct in two directions at once — left and down, or up and left, whatever gets you into the clear space of the webbing. If you are lucky, it will be a single offset.
The thing you cannot give away is the square footage. The duct was sized to move a certain amount of air over a certain distance before it reduces and branches off. Move it sideways all you want. Do not make it too much smaller on the way.
If you are laying one out rather than eyeballing it, there is a 3-4-5 offset calculator on the site.
When the duct will not fit: a pair of pants
The second way is to put a pair of pants on it.
A pair of pants separates one duct into two, sized so each leg fits the space you have between the webbing. It goes through as two, and then it comes back together as one on the other side.
Same rule as the offset, and this is where people build a restriction without realizing it. The two legs added together have to equal the duct they came from. If the legs are undersized, you have just necked the whole run down at that joist. The transitions flare out at the big ends so the sum holds.
I had one job with the joists on seven foot centers. We put a pair of pants through every single one of them. It looked ridiculous. It was also the only way that duct was getting across that building.
Never take a take-off off a pair of pants
Write that one down. Or simply, never take off your pants.
The branch lines cannot come off of a pair of pants fitting. The pressure doesn’t work for the CFM in this condition. Pull a branch off one of them and you are feeding that branch from half the air, and nobody balancing the system later is going to guess that is what happened.
If you need a take-off in that area, it needs to be in a full size duct— width and height, length can be modified to enough room for a take off — required for that run.
Hanging below the joist
Bottom of joist is the simpler half of the job.
To strap it, run the strap around the joist and screw the lap of it together. Same as above the deck, just easier to reach. Minimum two screws.
Leave an inch, or listen to it forever
Keep a minimum of one inch of gap between the duct and the joist.
The last thing you want is a little rattle that nobody can find. Metal touching steel, moving a thousandth of an inch every time the fan cycles, in a ceiling somebody has to take apart to chase it. That inch costs nothing at install and it is a bear later to modify.
Straps settle, and they do not settle evenly
Here is what happens to that inch.
You wrap the strap over the joist, put two screws in the lap, and leave yourself the gap. Then the rest of the system gets built. As the full weight of the system is loaded, the weight of the duct stretches the straps. The loops pull down. They do not all pull the same amount.
What you end up with is a run that reads like very faint rolling hills. It is hard to see from the floor looking up at a ceiling. It is still there, and the guy who notices it is the one who cares about the same things you do.
The other failure is the one on the strap page — a screw that catches the edge of the strap instead of the middle of it, and pulls out under load.
When you build a trapeze instead
Here is the trigger, and it is simpler than people make it: you build a trapeze when there is something in the way of getting a strap on the duct.
That is it. Not duct width, not weight, not a rule about spans. If a strap can go around it, strap it. If something is in the way, you put a solid something between straps or Allthread under it and support it from below instead.
And only use the length you need to get around the thing in the way. A trapeze longer than the obstacle is more steel to buy, more to hang and more to keep level. And, if the span is too long, an engineers input may be needed.
Unistrut and all-thread
The version everybody knows is Unistrut with all-thread rod. The rod attaches up at the structure, the strut runs across underneath, and the duct sits on top of the strut.
The advantage over strap is that it stays adjustable after it is installed. A strap is fixed the moment you screw it off.
The bent angle trapeze, and how it fails
The other way we built them was out of 24 gauge, bent at ninety degrees — two inches up and two inches horizontal. It gets attached to the straps on each end, and the duct gets a screw through the bottom of the angle at two or three spots. No screws in the sides of the duct in this application.
It works and it is cheap and easily sourced.
If the duct is big, it is heavy, and the weight bends the ends of the angle right where the straps attach. They wing up on you. You get the same thing from the other direction with a light duct and too long a span between attachments — the angle has nothing holding the middle and the ends roll.
We followed the drawings if it was noted on weight and type of supports. Sometimes that strap was a unistrut.
Sizing the support
Size the support for what you are actually hanging. Material weight and support limitation tables exist and they are a quick guide — the duct has a weight per foot, the support has a capacity, and the two have to make sense together.
When the spec calls for seismic bracing
Everything above is how duct gets supported on a normal job. Seismic is the case where normal is not the answer, and it is worth knowing where that line sits even if you never cross it.
The requirements come from two places: the project specification, and SMACNA. Once duct reaches a certain size, they apply. I am not putting a number here, because that number belongs to your project and not to a blog post. The spec is what tells you.
On most jobs it never comes up at all. Strap and angle, or all-thread and Unistrut, is sufficient and that is the end of it. Most companies will go their entire existence without engaging an engineer to do a seismic analysis on a project.
When it does come up, it is not a field decision and it is not a rule of thumb you can carry from the last job.
It is a delegated design in most cases. I have been the project manager on jobs that required it, and the way it ran was this: the spec and drawings put it on the mechanical contractor. The mechanical guy hires his own engineer. That engineer produces a plan that meets the design intent of the project, and it gets reviewed with the design team. Nobody on the crew is picking bracing out of a table and nobody is deciding it on the job.
So the practical version is short. Read the drawings and spec before you hang anything. If it calls for seismic, that is a conversation that starts in the office, and the answer comes back to you on paper.
And I will be straight about the limit of what I am telling you. I have reviewed seismic work as a project manager. I have not engineered it. If your job has it, the stamped plan is the answer and this page is not.
Getting the bar level
With straps you adjust each one on its own. With a bar under the duct, the bar is either level or it is not, and it holds whatever you set.
On all-thread, put a torpedo level on the strut and adjust the nuts until it sits flat.
On strap, you are measuring — off the floor, or off a laser. Get your height, bend the strap so a tab goes under the strap, and screw the tab to the bent metal.
Those pair up the way you would expect. All-thread goes with Unistrut. Strap goes with bent angle. You do not usually mix strap with strut.
Round duct on a bar
People ask what keeps round duct from rolling off a trapeze. Nothing does, and nothing needs to. The strut or the strap is already in the way. It cannot go anywhere.
What round actually needs is a support every ten feet, and ten feet is a maximum, not an interval.
If you cannot land one at ten because of what is up there, move it to six, or to wherever you can actually reach, and start your spacing over from that point. Shorter is always allowed. Ten feet is a gift and you are free to not use all of it.
How round hangs the rest of the time is on the round duct page, and the spacing side is on the hanger spacing page.
Do not land a support on a joint
A strap sitting right at a drive joint is not impossible. It is just annoying, and it fights you the whole time you are trying to get the duct level.
This is a layout problem, not an install problem. Plan where the supports land before you start hanging and the joints take care of themselves.
What you attach to: the beam clamp
All-thread has to thread into something. That something is a beam clamp.
A bolt runs through the clamp and tightens against a stop, gripping the top of the bottom chord. The body of the clamp has a threaded hole in it for the rod. You put two of them where the trapeze needs to hang, drop your rod, and carry the duct on strut between them.
Concrete on deck: pins and cast-in inserts
When there is concrete poured on the metal deck, the deck is no longer something you thread a strap through. Two ways we handled that.
The older way is a powder actuated gun. You shoot a pin through the strap into the deck wherever you need it. Fast, and it works. Be sure to scrape and sound proof insulation or fire coating insulation prior to shooting. If you remove those, they need to be replaced.
The way it goes on newer projects is better. Before the pour, you nail threaded inserts down onto the formed deck at your hanger locations. The concrete goes over them. When the forming material gets stripped away, there is a threaded receiver sitting there in the underside of the deck ready for rod.
They come in different colors and the trades use different colors, so when you are under a deck looking up at a hundred of them you can tell which ones are yours (each trade picks a color). Hilti makes them and so do others — the color coding is the part that saves you time.
The catch is that this only works if somebody laid them out before the pour. Miss that window and you are back to the powder actuated gun.
If the deck is cast concrete on W metal deck, those cannot be used and they will all need to be shot in with a powder actuated gun.
Never hang off another trade
Not sprinkler. Not conduit. Not somebody else’s pipe.
Always go to structure.
Two reasons, and only one of them is about load. The first is that every trade is responsible for their own work and has to own their final product — you hanging off their material makes your problem into their problem. The second is that it looks like exactly what it is. Any owner who has walked a good job will spot a bad one, and this is one of the things they spot.
Low voltage control wire, if allowed to free-hang, should not tie to other trades work either.
Who fire-caulks the penetration
When duct goes through a rated assembly, somebody has to seal it, and on a commercial job that is a question with a contract answer rather than a field answer.
Some projects hire a fire caulking company to do all of it. On others it gets written into the contract of the sub doing the work. The majority of the time the sub is responsible for their own penetrations, and that is pretty standard.
Find out which one your job is before you cut the first hole, not after. More on how that kind of thing gets decided is on the drawings page.
Common questions
Can you cut a steel joist to run ductwork through it?
No. Not the chords, not the web, not any part of it. If the duct will not pass through the opening with clearance on every side, the duct is what changes — a double or single offset to go around it, or a pair of pants to fit through it.
What is a pair of pants in ductwork?
It is one duct split into two smaller ones so each leg fits through a tight space, then brought back together on the other side. The two legs added together have to equal the duct they came from, or you have built an air flow restriction.
How do you attach a duct hanger to a steel joist?
You do not screw into it. Wrap the strap around the member and fasten the lap to itself with at least two screws. For a trapeze, use a beam clamp on the bottom chord and hang all-thread from it.
When do you use a trapeze instead of strap?
When something is in the way of getting a strap around the duct. That is the whole trigger. If a strap can go around it, use strap.
How far apart do supports go on round duct?
Ten feet is the maximum, not a target. If something is in the way at ten, move the support to six or wherever you can reach and start the spacing over from there. Check your tables. As duct gets bigger, limits shrink.
Can you hang ductwork from sprinkler pipe or conduit?
No. Always go to structure. Every trade owns their own work, and hanging off somebody else’s gives you more work to do later.
Most of that gets decided long before anybody is on a lift, in what the mechanical drawings tell you about routing and elevation.
Does ductwork need seismic bracing?
Sometimes, and the project specification is what tells you. Past a certain duct size the requirements apply, and the spec or SMACNA defines that for your job. On most projects it never comes up and normal strap or trapeze support is sufficient. When it does apply it is usually a delegated design — the mechanical contractor hires an engineer who produces a bracing plan meeting the design intent. It is not something you work out in the field.
The residential version of this job — TJI joists, a trunk under the floor and round pipe in the bays — is on the floor joists page. If you are still building the bag, here is the ductwork tools list.