A Pittsburgh seam by hand is one of those things I never actually thought of as a post until someone asked how to do it. Here’s how I make one in the field with nothing but hand tools.
I worked as an HVAC sheet metal tinner for about four years. I’ve been in construction more than twenty years, and I manage construction projects in Salt Lake now. This is how I’d show an apprentice to make a field-made Pittsburgh seam with hand seamers.
What You Need for a Pittsburgh Seam by Hand
The only tools you need for a Pittsburgh seam by hand are a tape measure, a marker and hand seamers.
That’s the whole list. If you don’t have seamers yet, they’re on my ductwork tools list.
The Layout Math for a Pittsburgh Seam by Hand
Start with the metal. You need a tail you can bend, beyond the length and width needed.
One end gets a 90 degree bend. That’s the male end, and it goes into the field-made Pittsburgh seam on the opposite duct. That bend should be about 1/2″, and it bends toward the inside of the duct. It doesn’t matter when you bend it, before or after the Pittsburgh side.
On the other side, you bend up the Pittsburgh seam.
For a 1/2″ male end to go into the field-made Pittsburgh seam, you need about a 9/16″ female receiver channel. You will need to bend that length twice.
If you are familiar with the Pittsburgh seam, you are probably questioning why I have noted a 1/2″ for the male end. When building these in the field, building the Pittsburgh seam by hand can be notoriously loose. A screw in a couple of spots really secures it from sliding or coming loose. That 1/2″ gives you something to bite into.
The Pittsburgh seam lays over the opposite duct, so you need an overhang to do that. It is typically 1/4″ when it comes off the machine. Try to match that in the field.
Add it up:
- 9/16″ for the first channel bend
- 9/16″ for the second channel bend
- 1/4″ for the overhang
9/16″ + 9/16″ + 1/4″ tallies to a 1-3/8″ tail on one side and a 1/2″ tail on the other side.
Now draw your lines, before any bend. Every line is measured from the edge of the tail. Line 1 is the 1-3/8″ line, drawn across the whole length of the duct on the inside face. Line 2 is at the 13/16″ mark on the outside of the metal.
That 13/16″ isn’t a random number. It’s the 1/4″ overhang plus one 9/16″ channel. The other 9/16″ channel is the space between line 2 and line 1.
Lines are a great way to stay consistent. They give you an immediate visual to work from.
How to Bend a Pittsburgh Seam by Hand, Step by Step
When you bend a Pittsburgh seam by hand, start farthest away from the edge. That’s line 1.
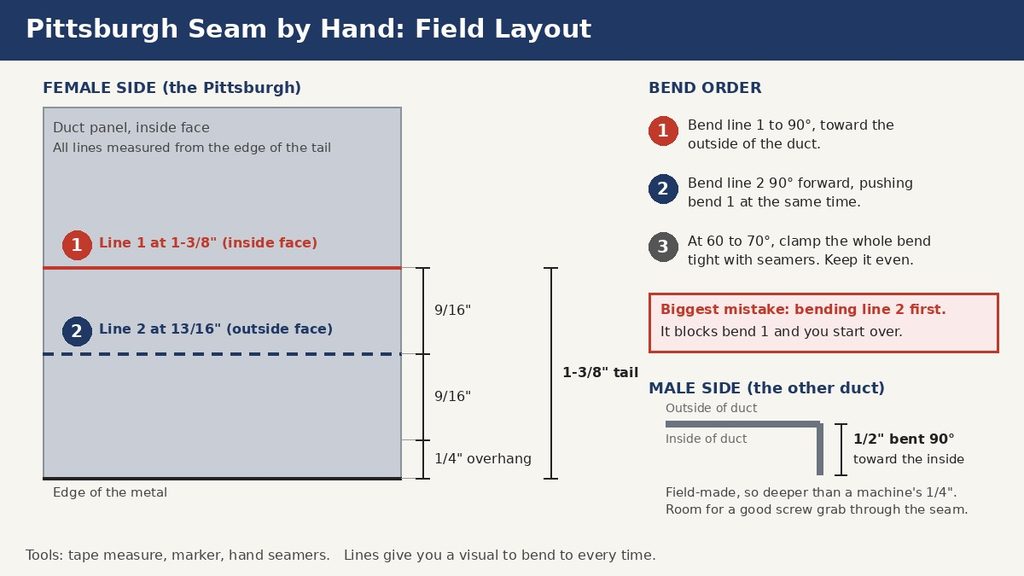
- Seam up to 90 degrees at line 1, the 1-3/8″ line, so the bend goes to the outside of the duct.
- Bend line 2, the 13/16″ line, 90 degrees forward. While you’re bending, push the bend so it bends the first bend at the same time.
- Once the first bend has reached 60 to 70 degrees, put your seamers over the whole bend and clamp the metal tight.
- Do this evenly. If it’s done inconsistently, the seam will have creases in it.
- Bring the two pieces together. The remaining tail folds over the other duct.
That’s it. Two lines, two bends, and the seamers do the closing.
The Biggest Mistake Is Bending the Outside First
The biggest mess-up on a Pittsburgh seam by hand is bending the outside seam first.
It will get in the way of the inner bend. Then it’s a lot of work to get it undone so you can start over.
That’s why you start farthest from the edge on this one.
Why a Pittsburgh Seam by Hand Runs Deeper Than the Machine’s
If the Pittsburgh machine makes it, the male end is a 1/4″ turn down. If you make it in the field, the female receiver channel can be as deep as you want. It could be 10 feet deep if you wanted to bend it that way.
The difference from the machine to the field is a person deciding how deep the channel should be. In my opinion, it needs to be deep enough to get a good screw grab through the seam if you need one. 1/4″ is not really big enough for that.
On a machine, the bend is very precise. The 1/4″ turn down is bent on a continuous brake with very little room for a mistake. In the field, an inconsistent bend or a female channel that isn’t tight enough can have a big impact. That’s why I go deeper by hand.
Where You’ll See a Pittsburgh Seam
Elbows have a Pittsburgh seam.
If you want to know how it’s different from the other seam you’ll meet on the job, I wrote up snap lock vs Pittsburgh seam.
The Trick That Gets You to the Seam Faster
Really get in the habit of pushing the first bend when you’re bending the second bend. It will get you to the seam faster.
That’s the push in step 2. Don’t skip it. It will save you wrist.
A Shortcut to a Pittsburgh Seam by Hand
Making the seam is a pain in the butt. If you use an S-cleat and screw the metal seams, you essentially accomplish the same thing. The male end needs to be 1″ instead of 1/2″, however.
The metal on the receiving side would be cut to exact size. The insert piece would be cut with the added length for the amount of s-cleats you are adding. Four corners get 4″.
Lines, Order and Even Pressure
That’s a Pittsburgh seam by hand. Draw your lines before any bend. Start farthest from the edge. Push the first bend while you bend the second. Clamp evenly with your seamers so you don’t get creases.
A seam is not a joint. When it’s time to connect sections end to end, that’s S cleats and drives. And if you’re still building your bag, here are the hand tools I’d buy first.