As an Amazon Associate I earn from qualifying purchases.
Introducing, the tinner. That’s a sheet metal worker — the dry side of
HVAC. Not gauges, not refrigerant. Metal, screws, and power and hand tools.
If that’s the side you’re starting on, this is the bag. Five tools you buy your
first week, and five more you’ll want by the time you’ve been at it a few
months. I carried every one of these every day, except the banders, you only need those on banding days.
Here’s the short answer below. Then I’ll go through each one and tell you what it’s actually for. (Safety tip, wear gloves. Metal is sharp)
Hand tools are half of it. Here is the full ductwork tools list, powered ones included.
Buy these five first:
- Duct board knife
- Offset snips
- Puncturing hammer
- Lineman pliers
- 11-in-1 screwdriver
Add these five next:
- Dikes (diagonal cutters)
- Banders
- Needle nose pliers
- Beater screwdriver / straight prybar
- Tool belt
Once you have got the bag, here is how the duct actually goes together.
On most commercial buildings and houses, HVAC contractors are dealing with duct, vents for fans, condensate lines, linesets for the AC units and a furnace.
On bigger projects, there could be a chiller system, a boiler system, with so many different things to make it complicated. The basics do not warrant a deep dive into the different systems. A lot of companies only do commercial buildings, dealing with roof top units, and residential units only dealing with in-home furnaces connected to coils and condensing units.
Some HVAC contractors also do gas piping to the furnaces but not all do. A RMGA certification is needed to run gas piping or be directly supervised by someone that has the certification.
This brief overview gives you a rough idea of how complicated HVAC can be so let’s get back to keeping it simple by giving HVAC Hand Tools for Beginners: What a Tinner Carries
Duct Board Knife
The first tool that will be needed is a duct board knife (paid link). There are many different kinds of these. Double serrated, non-serrated, serrated and non-serrated, and then the manufacturers that make them vary their design widely. Some with wimpy handles, some with holes in handles, some with blades in weird shapes.
My personal favorite is the serrated blade on one side and the razor sharp blade on the other. MEMORY LANE ALERT: Below is the first tool I ever bought as an HVAC laborer. I used it to cut insulation, tape, gyp board, my finger…oops. As it dulls I have taken it to the grinder. It was serrated on the far side when I bought it, the tip was pointed and the handle was a pretty durable wood. The metal is full length, I would never buy a duct board knife that did not have a full length metal integrated through the handle. They will break eventually. I bought this in 2005 for 11 dollars or so.
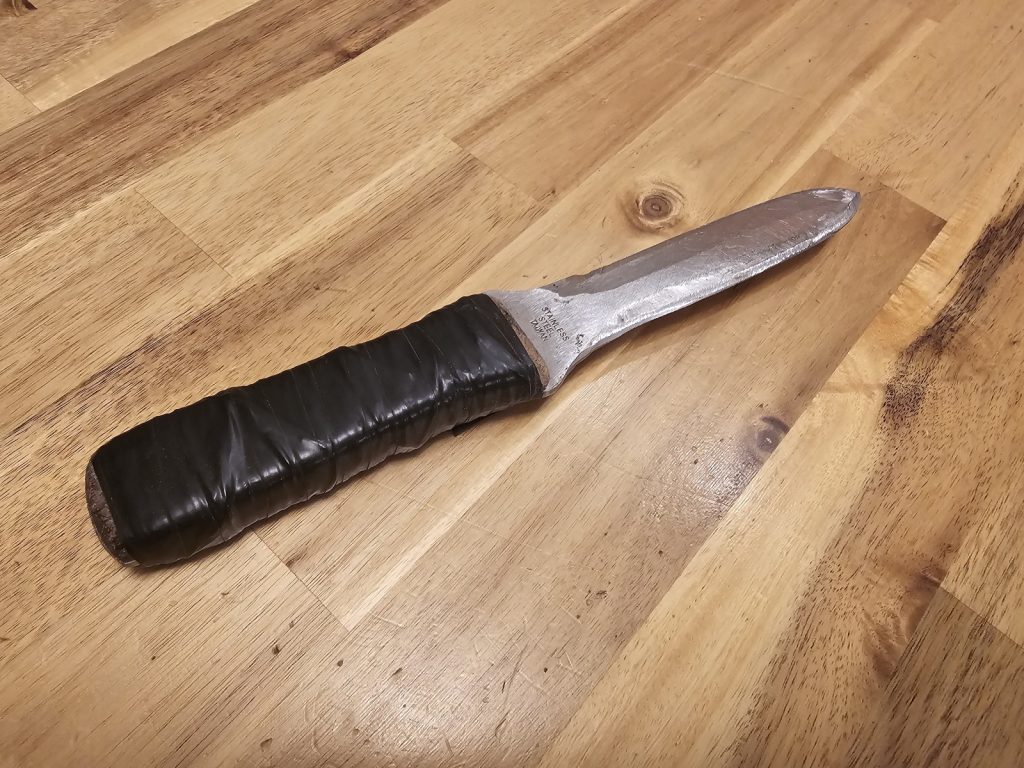
Let me explain why it is important to have a serrated blade and a razor sharp blade.
Being a duct board knife, it is important to have something that can easily chew through fibrous insulation without tearing it. When working with duct board, the serrated edge is the perfect tool.
Duct wrap is a much different animal. The fibrous material is loose and pulls easily when the serrated knife is used. The serrated edge tears the strings in the insulation and pulls the edges making them hard to tape on the duct.
I will show the perfect technique to get this to cut easily every time in a video but for now, ask a coworker with a lot of experience to show you a tip on how to cut it. It really was a sad day when someone that had been in HVAC for 20 years showed all of us two-year-in guys how to cut duct wrap and we realized that we had been doing it wrong.
Offset Snips — Left, Right, and Why It Matters
The next essential tool is the offset snips (paid link). The link goes to the red handled ones which are specific for a right handed person. If you are right handed, you will want the red handled ones. If you are left handed you will want the green handled ones.
This may seem weird but eventually you will need both. For now, you are only cutting straight and on relatively flat open spaces so no need for both.
Here is the difference between the two, the duct is pushed up when cut. So if you are cutting with the red snips, the left hand can hold the left side of the cut to stabilize the duct. If you are using the green snips, the opposite occurs. If you need a pair of green snips but do not have them, turn the snips backward and use them with your left hand. They will cut the same way the greens do but they hold weird.
Here is some more info on tin snips.
Puncturing Hammer
The hammer is another essential tool. I am not talking about a finishing hammer or a framing hammer. The claws on them make them pretty useless for puncturing duct. They work like other hammers for pounding metal drives though.
You will need either a HVAC hammer (paid link) or a roofing hammer. I prefer the roofing hammer but there are plenty of people who would use the HVAC hammer and do just as well.
The title of this section says it all, the hammer needs to puncture metal. There will be a lot of instances where branch lines are tied into the trunk line of the duct. To do this, take-offs will be used. That is a whole other section and topic. For now, you need something that will puncture the duct. The back of the hammer is one point for puncturing, the side is flat for hitting drivers, and the to head is perfect for hitting drives off to remove duct.
The real difference in hammers is in the handle. I always for for a rubber grip, the vibration will not get to you as quickly. The 18 oz. hammer is best in my experience, it is heavy enough to handle the stubborn drives that really need a pounding.
Lineman Pliers
Lineman Pliers (paid link) are going to save you in some different ways. When installing drives, they act as a reinforcement to strengthen the drive. They can strip and cut wire. They pry and clamp. They also can be used as hand seamers. This is a really great multipurpose tool.
The 11-in-1 Screwdriver or Multi-tool
The final essential hand tool is a 11-in-one (paid link). This is actually a cool tool. It will save your butt in so many instances. From installing a thermostats to removing screws in tight spaces. Consider this tool the Swiss Army Knife of the trade.
There is 7, 8, 9, 10-in-ones. I recommend the 11-in-one because it has the ⅜” nut driver. It is very rare to encounter the ⅜” head but when you do, you will be so glad that you have this tool.
The Next Five: What to Add Once You’re Working:
We made it through The Five Essential Hand Tools for HVAC Beginners but like any good construction guy, this is only the beginning. I personally collect tools and unfortunately had to get rid of a lot of them due to a move across states. It was a sad day to give up thousands of dollars worth of tools but it was necessary.
Once you have the tools listed above, I would recommend the following:
Dikes (Diagonal Cutters)
Used for pulling duct together instead of duct stretchers (paid link) (we only recommend offset duct stretchers so you don’t scrape your knuckles). Obviously these are pliers so they can be used as diagonal cutting pliers (paid link) as well.
Banders
The banders (paid link) are the convenient tool for synching zip ties. Lineman pliers can do this as well by clamping next to the base and rotating the loose end of a zip tie.
Needle Nose Pliers
This needle nose plier (paid link) tool will have a variety of uses from cutting wire, clamping, stretching duct and a variety of miscellaneous uses.
The Beater Screwdriver
Why not! A beater screwdriver or straight prybar (paid link) can be hit. Seriously this can be used to remove a drive without damaging the duct, chisel out wood in the way, and so many other uses. It will give you a reach in areas that need a pounding.
Tool Belt
The tool belt (paid link) is a must! Shoulder straps or suspenders are included. After loading down with screws and a drill this tool belt will get quite heavy to wear all day. Find out our tips on organizing your tools for efficiency from the garage to the website.
Common Questions
What tools does a beginner sheet metal worker need?
Hey listen, not trying to be judgmental. You don’t know anything yet. The tools you need will be for the run around grunt work. Get me this, hold this. Cut that for me so I can install it. The tools, and opportunity to use them will present themselves as you learn more and know what you need at what time.
What's the difference between the wet side and dry side of HVAC?
The wet side is refrigeration — gauges, refrigerant, charging a system. The dry
side is sheet metal — fabricating and hanging the ductwork the air moves
through. Different tools, different skills, often different people on the job.
Do I need both left and right offset snips, or just straight?
You do not need straight snips yet. Offsets are the best tool in the belt. If you are right handed buy the reds first. Green for left handers. The difference is the direction you can turn the cut. Green’s do not turn left, they turn right, which would be comfortable cutting with your left hand. Opposite for red.
What is a puncturing hammer used for?
A puncturing hammer makes a hole in the duct to cut in a branch or take off. You will be doing this a lot.
How much should a beginner expect to spend on their first hand tools?
This is actually hard to quantify. What brand and how many tools are you buying. The first 5 tools I will break down. I listed Wiss as the link. I like Wiss snips because the blades are thick, the grip is comfortable in the hand and they are economical. Midwest are a close second.
I want to be real right here. cutting duct wears out snips. They are going to break. The blade will snap off or the spring will shred off or the bolt will bend. The serration wears out and what used to cut easily will seam harder to manage.
The day one tool is the duct board knife or at least that was mine. I was cutting insulation in an attic in Wendover, Nevada in July, good times.
Companies can deduct tools off your check if you do not have any money to buy them. Talk to your employer to see if that is an option. Some employers may charge a fee for the convenience of buying on the company account.
All of the tools in this list are usually sold at a supply house behind the counter. Tools are not really discounted at supply houses. They are pretty standardly priced across the board. Most supply houses will carry a brand, however, not all brands. Not all brands make all tools so there will be a mix of brands.
- Duct board knife – $17-$25 plus tax and shipping
- Offset snips – $17-$55 plus tax and shipping
- Puncturing hammer – $40-$180 plus tax and shipping.
- Lineman pliers – $35-$55 – go with the 9.5 inch length, better leverage. Add tax and shipping.
- 11-in-1 screwdriver – $16 – $25 plus tax and shipping.
All in, you are sitting around $160 to $380 to start. I started one tool at a time and borrowed for the first few months until I had some money saved to buy more tools. Other people came with the entire set from the supply house, equipped with drills and all the gadgets. Over time you can spend thousands, tens of thousands. Stick with the basics to start. You don’t need all the tools everyday.
Once you’ve got the tools, you’ll need to bill for the work. I built a free
invoice and estimate tool for tradespeople — no signup, no subscription:
quickdrawinvoice.com
Want to see what else we have been working on: